
Self hosted cloud environment
I mentioned in a recent article that I’ve been building a self-hosted cloud environment to replace a lot of what I hosted on AWS.
My use of AWS has changed a lot over the years. I started out using EC2 instances and moved to hosting most of my apps and services on ECS clusters. I have also built fully serverless apps like Rock Your CV.
I have also been dabbling with Kubernetes, starting with a microk8s cluster that I built using Raspberry Pi 4s, but this proved to have a large number of issues especially with storage on SD cards which often failed due to the amount of disk activity on the cluster.
I’ve now built a new Kubernetes cluster and moved a lot of my ECS based services to it - and this article talks about how.
Setting up the cluster
My cluster barely deserves the name! It is 2-nodes, one master and one worker, although given the small size I allow non-control-plane pods to be scheduled onto the master. It is built from 2 Intel NUC 10i3FNHN nodes, each with a 2-core i3-10110U CPU @ 2.10GHz and 16GB of RAM. I chose them because they are small, consume little power and are relatively inexpensive.
One node (the master) has a 500GB SSD and the other has a 250GB SSD.
Each one runs the Ubuntu 22.04LTS ‘Jammy Jellyfish’ release, the stripped down server version, along with microk8s.
Here are my install steps:
Static IP and hostnames
Each node needs a static IP address and a unique hostname where the reverse lookup of the IP address matches that same hostname.
My network uses DHCP running on a Ubiquiti EdgeRouter, so once my NUCs had acquired their IP addresses for the first time I made those static in the router config so they would get the same address each time they requested one.
For the hostnames I updated the /etc/hosts file to provide the mapping from hostname to IP addresses, for example on my master node:
127.0.0.1 localhost
127.0.1.1 kube-2-master
10.0.xx.xx kube-2-worker-1
Installing microk8s I installed microk8s as part of the Ubuntu Server installation as it is one of the options, however if you don’t do that, you can install it on an Ubuntu LTS system (16.04 or higher) as follows:
sudo snap install microk8s --classic --channel=1.25/stableThere are more details about how to pick the channel here https://microk8s.io/docs/setting-snap-channel
Once installed, pick a node to be the master and for each worker node you want to add to the cluster run these commands.
On the master:
microk8s add-nodeThis will print several lines of joining instructions, pick the right one for you and then run it on the node you want to join the cluster. This is not the same node as where you ran add-node.
You can see if the joining has been successful by running microk8s kubectl get nodes.
rjk@***:~ $ microk8s kubectl get nodes
NAME STATUS ROLES AGE VERSION
kube-2-master Ready <none> 18d v1.24.4-2+2f38f78fa07274
kube-2-worker-1 Ready <none> 16d v1.24.4-2+2f38f78fa07274You may want to enable some addons as well. I use the following addons: dashboard, dns, ingress, and rbac. You can enable addons using this command microk8s enable [addon name].
The dns and ingress addons are quite important for the operation of the cluster, and I’d recommend using them.
Storage
I set up my master node (which has the larger hard drive) as an NFS server. This is to host my persistent volumes and allow them to run on any of the nodes and be able to access their data. Setting up NFS is pretty simple and I’m not going to cover it here, there are a lot of articles available which detail how to do this, an example is here https://linuxize.com/post/how-to-install-and-configure-an-nfs-server-on-ubuntu-20-04/
You need to remember to install the NFS client on any nodes which will host pods which need to mount NFS volumes. On Ubuntu this is done by installing the nfs-common package.
Remote control plane access
I did not want to be logged onto one of my Kubernetes nodes in order to be able to run kubectl. To do this you need to create a user and allocate that user the appropriate permissions.
Users in kubernetes use SSL certificates to confirm their identity to the API. I’m not going to cover creating users in detail here, but there is a good article you can refer to: https://www.adaltas.com/en/2019/08/07/users-rbac-kubernetes/
It is important to remember to put your username in the CSR CN field and to use the same username in the custer-role-binding, for example:
kind: ClusterRoleBinding
apiVersion: rbac.authorization.k8s.io/v1
metadata:
  name: rjk-cluster-admin
subjects:
  - kind: User
    apiGroup: rbac.authorization.k8s.io
    name: SAME AS CN
roleRef:
  apiGroup: rbac.authorization.k8s.io
  kind: ClusterRole
  name: cluster-admin
You can find the details you need to populate your ~/.kube/config by running the following command on one of your Kubernetes nodes microk8s config
You need to replace the details in the users section with the details of the certificate you created. An example output is below:
apiVersion: v1
clusters:
- cluster:
    certificate-authority-data: ***
    server: ***
  name: microk8s-cluster
contexts:
- context:
    cluster: microk8s-cluster
    user: admin
  name: microk8s
current-context: microk8s
kind: Config
preferences: {}
users:
- name: ***
  user:
    token: ***
A valid entry in the users section would be:
- name: ***
  user:
    client-certificate: path to certificate
    client-key: path to private key
    username: CN from cert
Network access
My nodes are sitting on my LAN, and most of the applications running on the cluster are exposed via Ingresses. I do have a small number of services which I expose as ClusterIP services because they are not offering HTTP/HTTPS services that can be consumed via an Ingress. Examples are my internal SMTP gateway and MQTT broker.
To allow access to my clusters’ service IP range from my LAN, I have added a static route to the master node IP address on my router e.g.
rjk@***:~$ ip route show
…
10.152.0.0/16 via 10.0.1.83 dev eth0  proto zebra
…
Most services are exposed using Ingresses, and for these I just have to have DNS entries pointing to my cluster. I have a DNS A record called ingress-k8s.<domain> which points to both nodes, and then for each service exposed as an Ingress I create CNAMES which point to this A record. This gives flexibility for changing the Ingress approach without having a lot of DNS entries to update.
SSL
I operate my own private certificate authority for my LAN services, but creating new certificates by hand for everything on my cluster would be a real-pain. Fortunately there is the excellent cert-manager application https://cert-manager.io/ which allows you to attach valid SSL certificates to your Ingresses, backed by public providers like Let’s Encrypt or by private PKI.
I’m using the private PKI option and there are great instructions on how to set this up in cert-manager’s documentation: https://cert-manager.io/docs/configuration/ca/
Then all I need to do is include the appropriate annotations in my Ingress manifests and my certificates are automatically generated and kept up-to-date:
apiVersion: networking.k8s.io/v1
kind: Ingress
metadata:
  annotations:
    cert-manager.io/issuer: ca-issuer
    kubernetes.io/ingress.class: "public"
  name: my-very-secure-portal
  namespace: default
…
  tls:
  - hosts:
    - my.host.name
    secretName: my-host-name-cert
External access
Given this is replacing an environment where I host publicly accessible services I needed a way to expose the services running on my cluster to external users. My ISP gives me a dynamic public IPv4 address - so I could not just say use NAT rules on my router to push port 443 through to one of my nodes, well I could, but it would need some kind of dynamic DNS setup. I did not want to do this anyway because it seemed like too much of a security risk - my network is not built to handle the kind of attacks that AWS load balancers can mitigate.
So instead I settled on using Cloudflare Argo tunnels to establish a connection to Cloudflare and then I could point subdomains to the tunnel in order to expose my applications and services to public users. This means I’m protected by Cloudflare’s scale, and not allowing connections to my services unless they pass my web-application-firewall rules.
Cloudflare also takes care of terminating SSL and generating certificates, so I don’t have to do that with my own services or configuration.
There’s a good tutorial for setting this up here: https://developers.cloudflare.com/cloudflare-one/tutorials/many-cfd-one-tunnel/
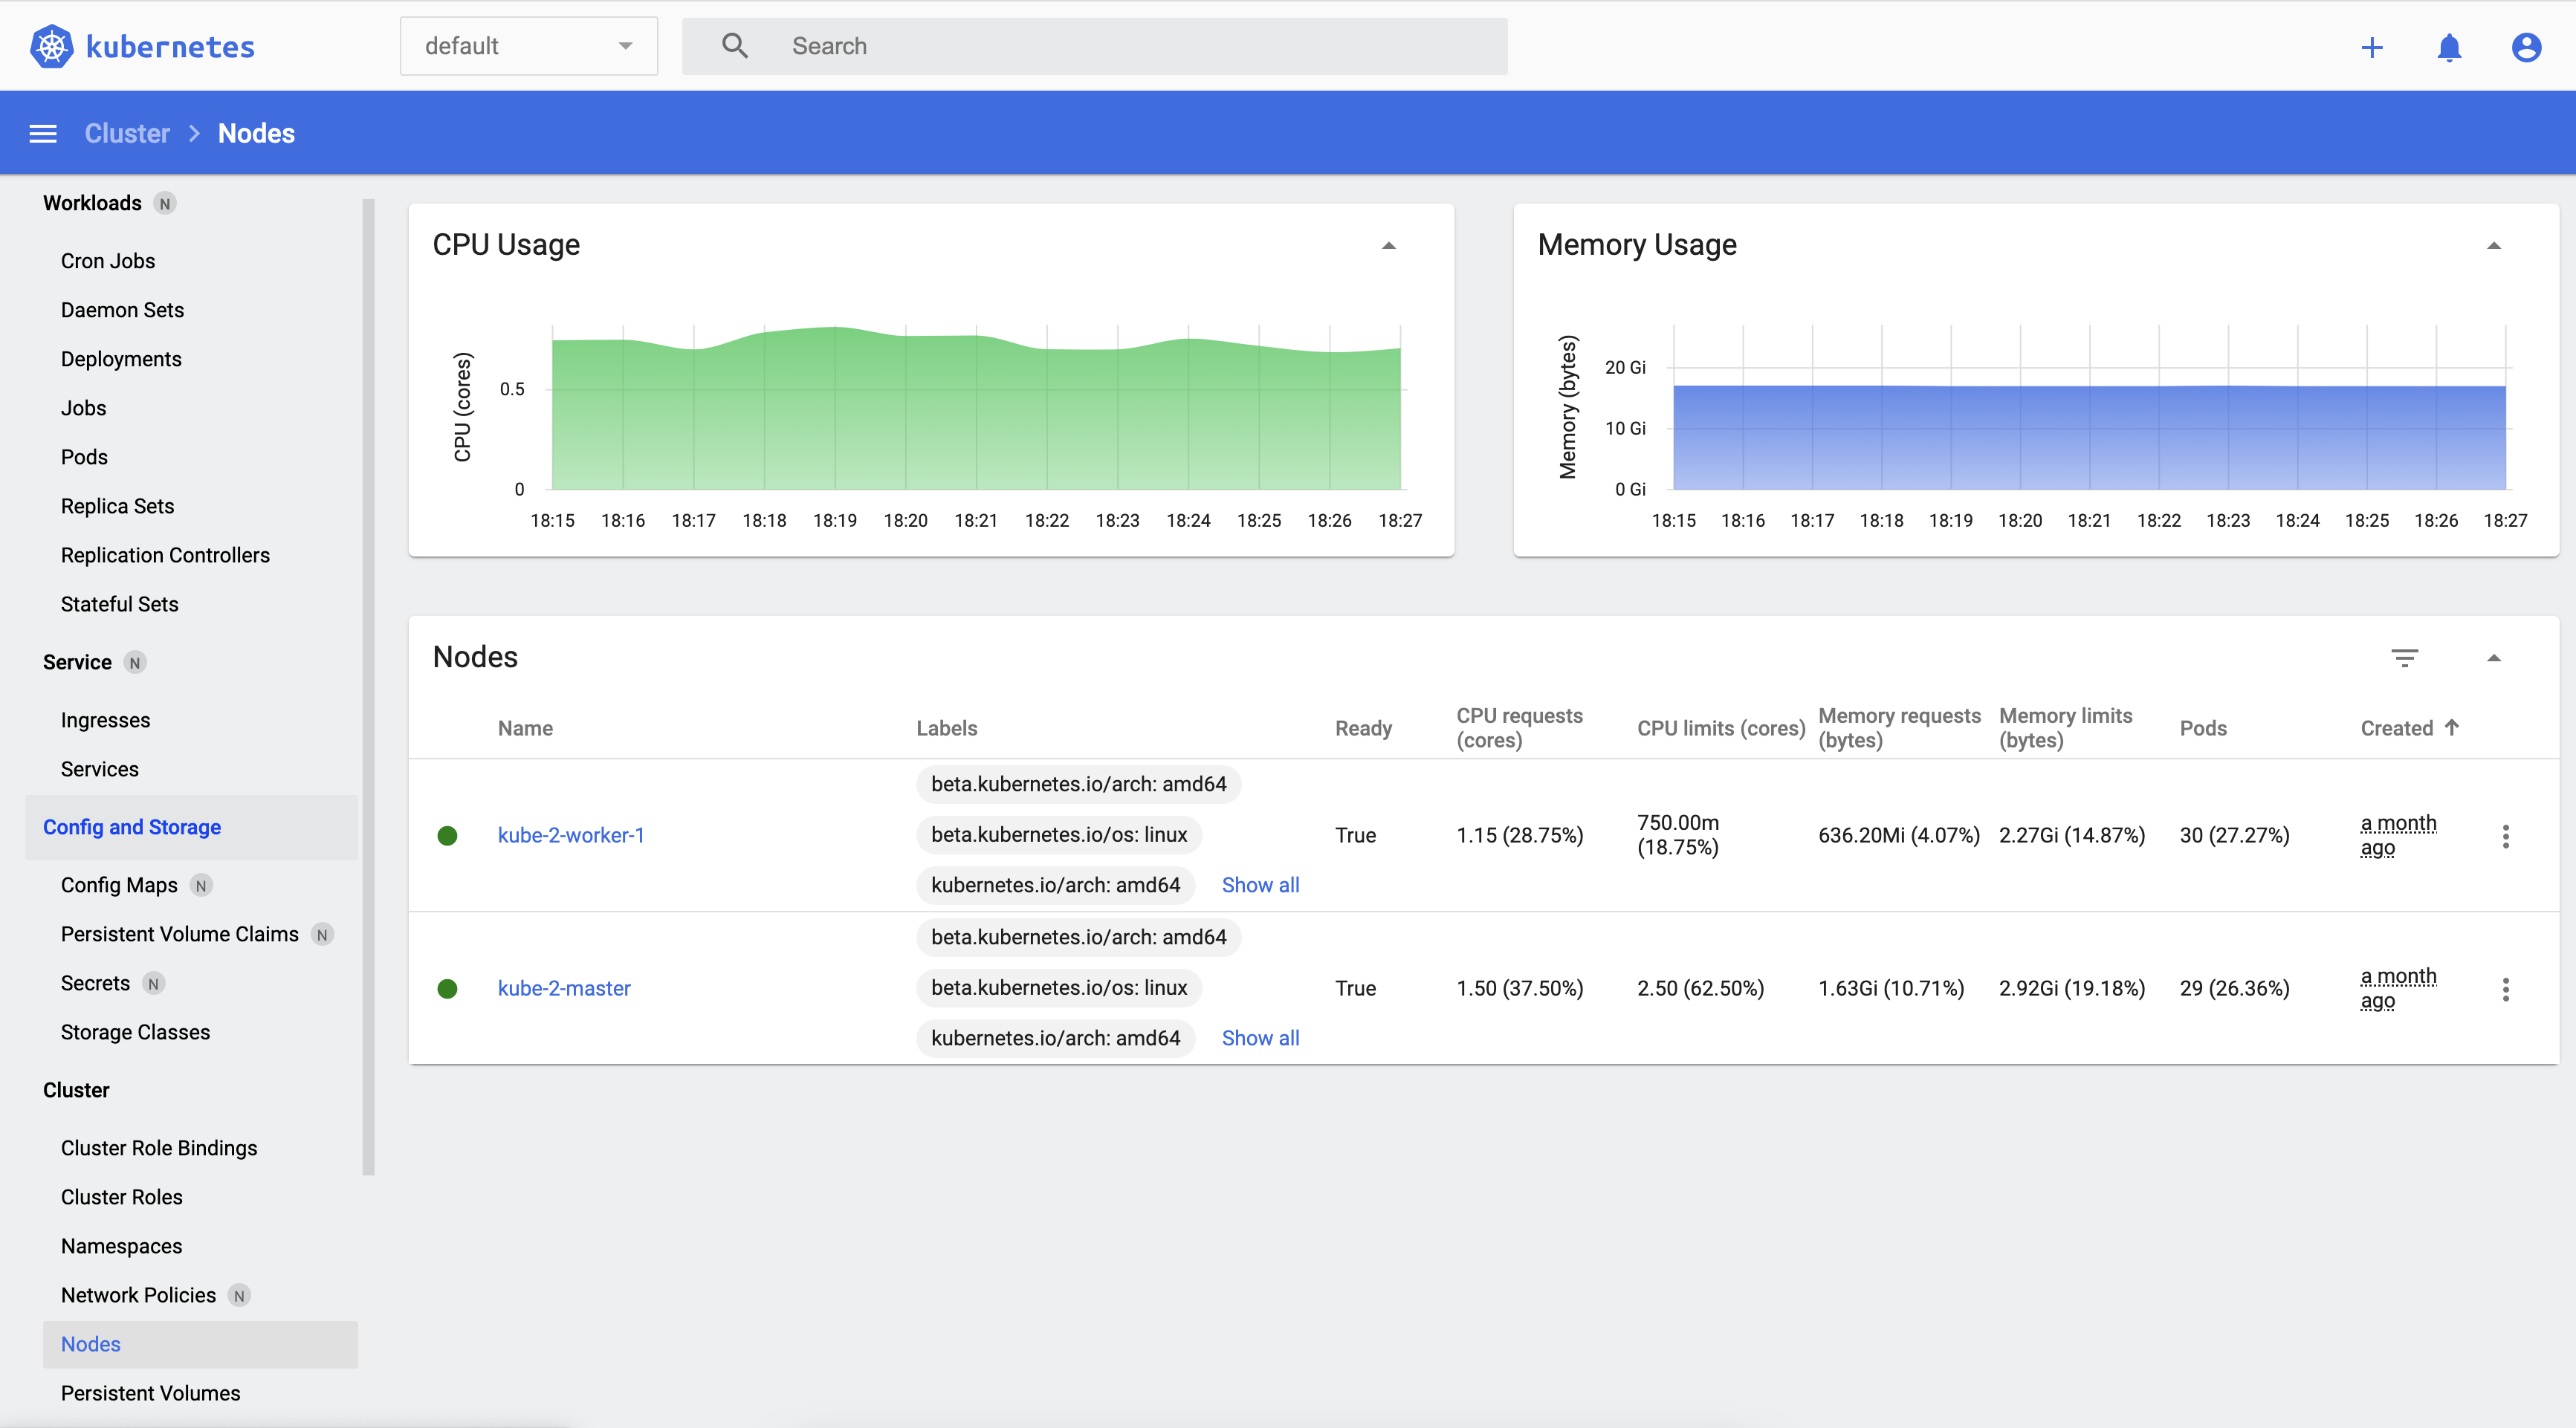
Observing the cluster
There is a pretty good dashboard built into K8s which you can use to see the status of deployments, pods, services, ingresses and nodes.
Out of the box this dashboard needs a token or kubeconfig in order to access the underlying control plane APIs - however I did not want to do this every time.
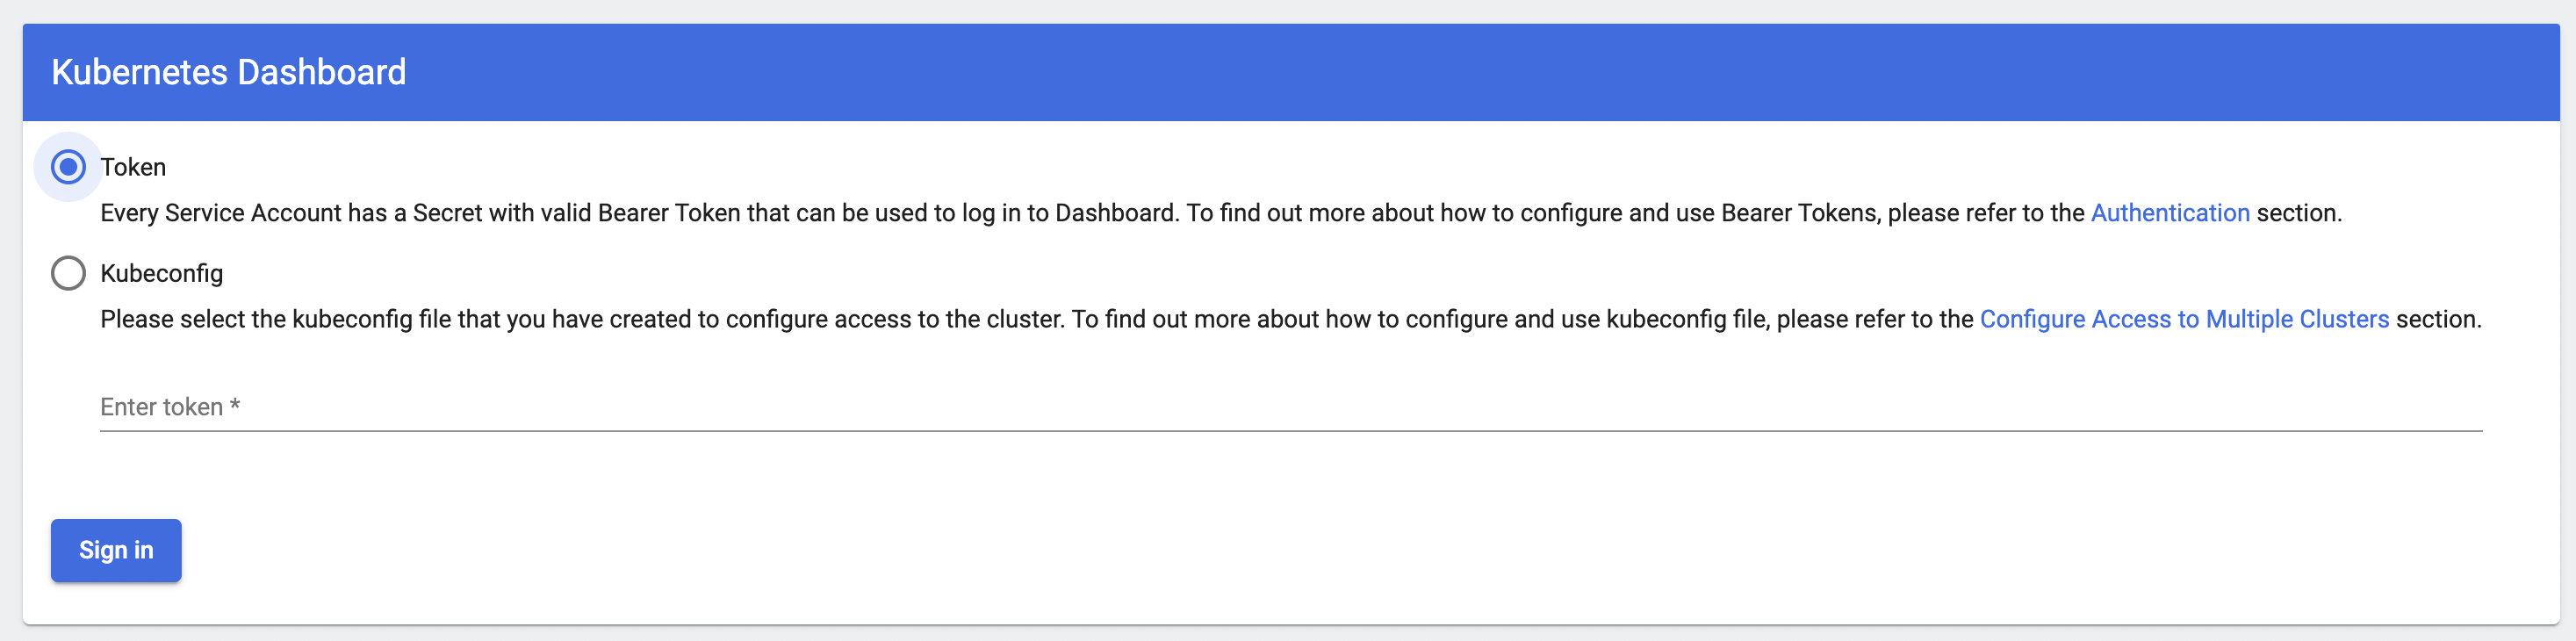
The dashboard also supports injecting credentials in the request headers and you can use this to build a solution where a reverse proxy can inject this token for you. As part of a tutorial, Cloudflare built a small proxy which does just that and you can find the source code here https://github.com/cloudflare/argo-tunnel-examples/tree/master/sharing-k8s-dashboard/dashboard-auth-proxy
I use this behind my OIDC reverse proxy https://github.com/richardjkendall/oidc-rproxy in order to allow specific users access to the dashboard.
Here’s an example of my deployment manifest for this:
apiVersion: apps/v1
kind: Deployment
metadata:
  name: dashboard-auth-proxy
  labels:
    app: dashboard-auth-proxy
spec:
  replicas: 1
  selector:
    matchLabels:
      app: dashboard-auth-proxy
  template:
    metadata:
      labels:
        app: dashboard-auth-proxy
    spec:
      containers:
        - name: oidc
          image: richardkendall/oidc-rproxy
          imagePullPolicy: "IfNotPresent"
          ports:
            - containerPort: 80
          envFrom:
            - configMapRef:
                name: dashboard-oidc-config
        - name: dashboard-auth-proxy
          image: <registry>/dashboard-auth-proxy
          ports:
            - containerPort: 8000
          env:
            - name: LISTEN_ADDRESS
              value: localhost:8000
            - name: DASHBOARD_PROXY_URL
              value: https://kubernetes-dashboard.kube-system.svc.cluster.local
            - name: DASHBOARD_TOKEN
              valueFrom:
                secretKeyRef:
                  name: dashboard-admin-token
                  key: token
All done!
So here we are at the end, I have a working kubernetes cluster, shared storage, automatic SSL provisioning for my internal network and external load balancing via Cloudflare.
I’m very happy with what I’ve built and I’ve moved all my ECS services to it. Doing this has reduced my AWS bill each month by 70%!
I’ve not removed all my AWS dependencies, I still use S3 for object storage and DynamoDB as a document database. I’m going to explore moving S3 to Cloudflare’s R2 service, but that’s for another day. I’ll admit a downside of moving my workloads out of AWS is that I’ve lost the nicely injected credentials which allowed simple access to AWS services like S3 and DynamoDB - now I have to inject these as environment variables from secrets.
You can visit a service running on the cluster now, go to www.richardjameskendall.com!
-- Richard, Oct 2022